

搜索到
124
篇与
cludechn
的结果
-
 Typecho主题Butterfly 这是Typecho版本的butterfly主题。移植特色方便原hexo的博文转移,因为都是md文档原butterfly的用户可以直接使用原版butterfly主题的css文件,拥有原先同样的效果注意:移植并非为最新版butterfly,你的index.css可能会在本主题出现bug由于使用动态博客,大部分功能可以让程序去实现,不用借助第三方api(可在主题外观设置中自定义)在线编辑文档搜索、加密和置顶文章可以直接使用(相比hexo无需太多额外配置)相比hexo,程序安装更加方便,使用更加高效网站咨询显示同时在线人数(某些虚拟主机似乎无法使用)可在后台设置侧边栏信息以及侧边栏的隐藏和显示后续将开发更多功能已实现的功能支持评论区谷歌人机验证、hcaptcha人机验证全站加密或禁止访问一键开启魔改主题单独设置文章过期提醒文章加密(博客程序自带)后台设置需要置顶文章后台设置友链并可以使html自定义友链文章内可设置回复可见卡片化设计支持二级目录双栏设计响应式主题夜间模式Pjax文章阅读模式简体和繁体转换电脑和手机都可查看TOC目录内置多种代码配色(darker/pale night/light/ocean/mac/mac light),可自定义代码配色代码块显示代码语言/关闭或展开代码块/代码复制/代码自动换行可关闭文字复制/可开启内容复制增加版权信息)本地搜索Mathjax 和 Katex内置404页面显示字数统计显示相关文章过期文章提醒多种在线聊天(Chatra/Tidio/Daovoice/Gitter/Crisp)谷歌广告/手动广告位置修改网站配色打字特效 activate_power_mode多种背景特效(静止彩带/动态彩带/Canvas Nest)多种鼠标点击特效(烟花/爱心)内置一种 Preloader 加载动画Fancybox大图模式照片墙图片懒加载Snackbar弹窗PWA主题说明Typecho-Butterfly主题说明下载页面https://github.com/wehaox/Typecho-Butterfly
 -
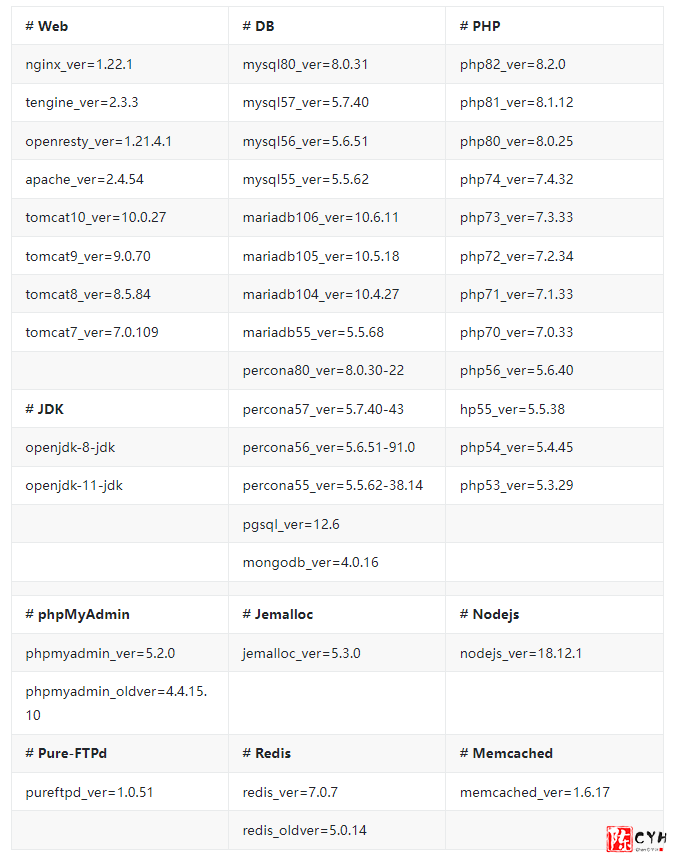
OneinStack建站脚本的安装部署 OneinStack安装脚本是使用shell编写的,以便快速部署LEMP/LAMP/LNMP/LNMPA/LTMP(Linux、Nginx/Tengine/OpenResty、MySQL在生产环境中/MariaDB/Percona、PHP、JAVA),适用于RHEL7、8、9(包括CentOS、RedHat、AlmaLinux、Rocky)、Debian9、10、11、Ubuntu16、18、20、22和Fedora27+等操作系统。包含以下组合lnmp(Linux + Nginx+ MySQL/MongoDB+ PHP)lamp(Linux + Apache+ MySQL/MongoDB+ PHP)lnmpa(Linux + Nginx+ MySQL/MongoDB+ PHP+ Apache):Nginx处理静态,Apache处理动态PHPlnmt(Linux + Nginx+ MySQL/MongoDB+ Tomcat):Nginx处理静态,Tomcat(JDK)处理JAVAlnpp(Linux + Nginx+ PostgreSQL+ PHP)lapp(Linux + Apache+ PostgreSQL+ PHP)支持系统版本CentOS 7~9(包括redhat,AlmaLinux,Rocky,Anolis)Debian 9、10、11Ubuntu 16、18、20、22Fedora 27+DeepinopenEuler,EulerOSKylinAmazon Linux 2Aliyun Linux 2~3,TencentOS 2~3特性持续不断更新,支持交互、无人值守安装源码编译安装,大多数源码是最新stable版,并从官方网址下载提供多个数据库版本(MySQL-8.0, MySQL-5.7, MySQL-5.6, MySQL-5.5, MariaDB-10.4,MariaDB-10.3,MariaDB-10.2,MariaDB-5.5,Percona-8.0, Percona-5.7, Percona-5.6, Percona-5.5,PostgreSQL, MongoDB)提供多个PHP版本(PHP-8.2,PHP-8.1,PHP-8.0,PHP-7.4,PHP-7.3,PHP-7.2,PHP-7.1,PHP-7.0,PHP-5.6, PHP-5.5,PHP-5.4,PHP-5.3)提供Nginx、Tengine、OpenResty、Apache和nginx waf功能提供多个Tomcat版本(Tomcat-10, Tomcat-9,Tomcat-8,Tomcat-7)提供多个JDK版本(OpenJDK-8, OpenJDK-11)根据自己需求安装PHP缓存加速器,提供ZendOPcache、xcache、apcu、eAccelerator。及php加解密工具ionCube、ZendGuardLoader根据自己需求安装Nodejs、Pureftpd、phpMyAdmin根据自己需求安装Memcached、Redisjemalloc优化MySQL、Nginx提供添加虚拟主机脚本提供Nginx/Tengine/OpenResty/Apache、PHP、Redis、Memcached、phpMyAdmin升级脚本提供本地备、远程(rsync)、阿里云OSS、腾讯云COS、又拍云、七牛云、亚马逊S3和Dropbox备份脚本开源软件版本安装方式自动脚本访问自动化脚本网址: 自动安装 ,根据自己的需求选择安装内容。最下方生成安装脚本,复制到服务器上直接执行即可。运行脚本最好使用screen命令开一个窗口执行,以保证Shell不会中断。交互安装安装发行版的依赖项,下载源代码并运行安装脚本。CentOS/Redhatyum -y install wget screenDebian/Ubuntuapt-get -y install wget screen下载源代码并安装wget http://mirrors.linuxeye.com/oneinstack-full.tar.gz tar xzf oneinstack-full.tar.gz cd oneinstack如果在安装过程中断开连接,则可以执行命令以重新连接到安装窗口screen -S oneinstack如果需要修改目录(安装、数据存储、Nginx日志),请在运行install.sh前修改文件options.conf./install.sh安装第二个PHP版本~/oneinstack/install.sh --mphp_ver 54 #/安装PHP5.4版本,--mphp_ver 54;PHP8.2版本,--mphp_ver 82添加扩展~/oneinstack/addons.sh添加虚拟主机~/oneinstack/vhost.sh删除虚拟主机~/oneinstack/vhost.sh --del添加FTP虚拟用户~/oneinstack/pureftpd_vhost.sh备份~/oneinstack/backup_setup.sh // Backup parameters ~/oneinstack/backup.sh // Perform the backup immediately crontab -l // Can be added to scheduled tasks, such as automatic backups every day 1:00 0 1 * * * cd ~/oneinstack/backup.sh > /dev/null 2>&1 &管理服务Nginx/Tengine/OpenResty:systemctl {start|stop|status|restart|reload} nginxMySQL/MariaDB/Perconasystemctl {start|stop|restart|reload|status} mysqldPostgreSQL:systemctl {start|stop|restart|status} postgresqlMongoDB:systemctl {start|stop|status|restart|reload} mongodPHP:systemctl {start|stop|restart|reload|status} php-fpmApache:systemctl {start|restart|stop} httpdTomcat:systemctl {start|stop|status|restart} tomcatPure-FTPd:systemctl {start|stop|restart|status} pureftpdRedis:systemctl {start|stop|status|restart|reload} redis-serverMemcached:systemctl {start|stop|status|restart|reload} memcached升级~/oneinstack/upgrade.sh卸载~/oneinstack/uninstall.sh
-
linux删除文件夹的相关命令 linux删除文件夹的命令:1、rmdir命令,使用“rmdir [-p] 文件夹名”即可删除空的指定文件夹;2、rm命令,使用“rm -rf 文件夹名”删除指定文件夹。linux删除文件夹1、使用rmdir命令 Linux rmdir(英文全拼:remove directory)命令删除空的目录。语法rmdir [-p] dirName参数:-p 是当子目录被删除后使它也成为空目录的话,则顺便一并删除。实例将工作目录下,名为 AAA 的子目录删除 :rmdir AAA2、使用rm命令 Linux rm(英文全拼:remove)命令用于删除一个文件或者目录。语法rm [options] name...参数:-i 删除前逐一询问确认。-f 即使原档案属性设为唯读,亦直接删除,无需逐一确认。-r 将目录及以下之档案亦逐一删除。示例:rm -rf /var/log/httpd/access将会删除/var/log/httpd/access目录以及其下所有文件、文件夹
-
Typecho语法大全/常用函数/调用方法 模板常用函数1、站点网址<?php $this->options->title() ?>2、站点网址<?php $this->options ->siteUrl(); ?>3、完整路径标题如分享几个 Typecho 中常用的调用函数<?php $this->archiveTitle(' » ', < span class="string">'', ' | '); ?><?php $this ->options->title(); ?>4、站点说明<?php $this->options->description() ?>5、模板文件夹地址<?php $this->options->themeUrl(); ?>6、导入模板文件夹内的 php 文件<?php $this->need('.php'); ?>7、文章或者页面的作者<?php $this->author(); ?>8、作者头像< ?php $this->author->gravatar('40') ?> *此处输出的完整的img标签,40是头像的宽和高。* 9、该文作者全部文章列表链接<?php $this->author->permalink (); ?>10、该文作者个人主页链接<?php $this->author->url(); ?>11 、该文作者的邮箱地址<?php $this->author->mail(); ?>12、上一篇与下一篇调用代码<?php $this->thePrev(); ?> <?php $this->theNext(); ?>13、判断是否为首页,输出相关内容<?php if ($this->is('index')): ?> //首页输出内容 <?php else: ?> //不是首页输出内容 <?php endif; ?>14、文章或页面,评论数目<?php $this->commentsNum('No Comments', '1 Comment' , '%d Comments'); ?>15、截取部份文章(首页每篇文章显示摘要),350 是字数<?php $this->excerpt(350, '...'); ?>16、调用自定义字段(官方文档坑爹,竟然没有,博主自己摸索出来的)<?php $this->fields->fieldName ?>17、RSS 地址<?php$this->options->feedUrl(); ?>18、获取最新 post<?php $this->widget('Widget_Contents_Post_Recent', 'pageSize=8&type=category')->parse('<li><a href="{permalink}">{title}</a></li>'); ?>19、纯文字分类名称,不带链接<?php $this->category(',', false); ?>20、获取当前文章所属分类(包含链接)<?php if ($this->is('post')): ?> <span><?php $this->category(' '); ?></span> <?php endif; ?>21、获取文章分类列表<ul> <?php $this->widget('Widget_Metas_Category_List') ->parse('<li><a href="{permalink}">{name}</a> ({count})</li>'); ?> </ul>22、获取某分类 post<ul> <?php $this->widget('Widget_Archive@indexyc', 'pageSize=8&type=category', 'mid=1') ->parse('<li><a href="{permalink}" title="{title}">{title}</a></li>'); ?> </ul>23、获取最新评论列表<ul> <?php $this->widget('Widget_Comments_Recent')->to($comments); ?> <?php while($comments->next()): ?> <li><a href="<?php $comments->permalink(); ?>"><?php $comments->author(false); ?></a>: <?php $comments->excerpt(50, '...'); ?></li> <?php endwhile; ?> </ul>24、首页获取 最新文章 代码限制条数<?php while ($this->next()): ?> <?php if ($this->sequence <= 3): ?> html <?php endif; ?> <?php endwhile; ?>25、获取最新评论列表 (只显示访客评论不显示作者或者说自己发的评论)<?php $this->widget('Widget_Comments_Recent','ignoreAuthor=true')->to($comments); ?> <?php while($comments->next()): ?> <li><a href="<?php $comments->permalink(); ?>"><?php $comments->author(false); ?></a>: <?php $comments->excerpt(50, '...'); ?></li> <?php endwhile; ?>26、获取文章时间归档<ul> <?php $this->widget('Widget_Contents_Post_Date', 'type=month&format=F Y') ->parse('<li><a href="{permalink}">{date}</a></li>'); ?> </ul>27、获取标签集合,也就是标签云<?php $this->widget('Widget_Metas_Tag_Cloud', 'ignoreZeroCount=1&limit=28')->to($tags); ?> <?php while($tags->next()): ?> <a href="<?php $tags->permalink(); ?>" class="size-<?php $tags->split(5, 10, 20, 30); ?>"><?php $tags->name(); ?></a> <?php endwhile; ?>28、调用该文相关文章列表<?php $this->related(5)->to($relatedPosts); ?> <?php if ($relatedPosts->have()): ?> //这句也可以写成 if (count($relatedPosts->stack)) <ul><?php while ($relatedPosts->next()): ?> <li><a href="<?php $relatedPosts->permalink(); ?>" title="<?php $relatedPosts->title(); ?>"><?php $relatedPosts->title(); ?></a></li> <?php endwhile; ?></ul> <?php else : ?> <li>无相关文章</li> <?php endif; ?>29、隐藏 head 区域的程序版本和模版名称<?php $this->header("generator=&template="); ?>30、获取读者墙<?php $period = time() - 999592000; // 時段: 30 天, 單位: 秒 $counts = Typecho_Db::get()->fetchAll(Typecho_Db::get() ->select('COUNT(author) AS cnt','author', 'url', 'mail') ->from('table.comments') ->where('created > ?', $period ) ->where('status = ?', 'approved') ->where('type = ?', 'comment') ->where('authorId = ?', '0') ->group('author') ->order('cnt', Typecho_Db::SORT_DESC) ->limit(25) ); $mostactive = ''; $avatar_path = 'http://www.gravatar.com/avatar/'; foreach ($counts as $count) { $avatar = $avatar_path . md5(strtolower($count['mail'])) . '.jpg'; $c_url = $count['url']; if ( !$c_url ) $c_url = Helper::options()->siteUrl; $mostactive .= "<a href='" . $c_url . "' title='" . $count['author'] . " (参与" . $count['cnt'] . "次互动)' target='_blank'><img src='" . $avatar . "' alt='" . $count['author'] . "的头像' class='avatar' width='32' height='32' /></a>\n"; } echo $mostactive; ?>31、登陆与未登录用户展示不同内容<?php if($this->user->hasLogin()): ?> // 登陆可见 <?php else: ?> // 未登录和登陆均可见 <?php endif; ?>32、导航页面列表调用隐藏特定的页面 这个演示隐藏了 album 和 search 两个页面<ul> <li<?php if($this->is('index')): ?> class="current"<?php endif; ?>><a href="<?php $this->options->siteUrl(); ?>">主页</a></li> <?php $this->widget('Widget_Contents_Page_List')->to($pages); ?> <?php while($pages->next()): ?> <?php if (($pages->slug != 'album') && ($pages->slug != 'search')): ?> <li<?php if($this->is('page', $pages->slug)): ?> class="current"<?php endif; ?>><a href="<?php $pages->permalink(); ?>" title="<?php $pages->title(); ?>"><?php $pages->title(); ?></a></li> <?php endif; ?> <?php endwhile; ?> </ul>参数说明:9.0 版 typecho 支出在后台管理页面编辑时选择隐藏页面。33、Typecho 归档页面<?php $this->widget('Widget_Contents_Post_Recent', 'pageSize=10000')->to($archives); $year=0; $mon=0; $i=0; $j=0; $output = '<div id="archives">'; while($archives->next()): $year_tmp = date('Y',$archives->created); $mon_tmp = date('m',$archives->created); $y=$year; $m=$mon; if ($mon != $mon_tmp && $mon > 0) $output .= '</ul></li>'; if ($year != $year_tmp && $year > 0) $output .= '</ul>'; if ($year != $year_tmp) { $year = $year_tmp; $output .= '<h3 class="al_year">'. $year .' 年</h3><ul class="al_mon_list">'; //输出年份 } if ($mon != $mon_tmp) { $mon = $mon_tmp; $output .= '<li><span class="al_mon">'. $mon .' 月</span><ul class="al_post_list">'; //输出月份 } $output .= '<li>'.date('d日: ',$archives->created).'<a href="'.$archives->permalink .'">'. $archives->title .'</a> <em>('. $archives->commentsNum.')</em></li>'; //输出文章日期和标题 endwhile; $output .= '</ul></li></ul></div>'; echo $output; ?>34、获取当前文章页缩略图<?php $this->attachments(1)->attachment->url(); ?>务必注意,这里所谓缩略图指的是当前文章页第一个附件地址,请确保第一个附件类型为图片。35、根据页面类型显示内容判断是文章页则显示内容<?php if ($this->is('post')): ?> 想要显示的内容1 <?php endif; ?>判断是页面则显示内容<?php if ($this->is('page', 'about')): ?> 想要显示的内容2 <?php endif; ?>36、Title增加副标题<?php if ($this->is('index')): ?> - 副标题<?php endif; ?>37、按分类输出cms<div class="row"> <?php $this->widget('Widget_Metas_Category_List')->to($categories); ?> <?php while ($categories->next()): ?> <?php if(count($categories->children) === 0): ?> <?php $this->widget('Widget_Archive@category-' . $categories->mid, 'pageSize=5&type=category', 'mid=' . $categories->mid)->to($posts); ?> <div class="col-lg-6"> <div class="panel panel-default"> <div class="panel-heading"> <i class="glyphicon glyphicon-th"></i> <a href="<?php $categories->permalink(); ?>" class="guidang" id="posts-list-<?php $categories->slug(); ?>"><?php $categories->name(); ?></a> <a href="<?php $categories->permalink(); ?>" class="pull-right" id="posts-list-<?php $categories->slug(); ?>"><i class="glyphicon glyphicon-option-horizontal"></i></a> </div> <div class="panel-body"> <?php while ($posts->next()): ?> <p class="overflow"> <a href="<?php $posts->permalink(); ?>" title="<?php $posts->title(40); ?>"><i class="glyphicon glyphicon-chevron-right"></i> <?php $posts->title(40); ?></a> </p> <?php endwhile; ?> </div> </div> </div> <?php else: ?> <?php endif; ?> <?php endwhile; ?> </div>38、相关文章<?php $this->related(5)->to($relatedPosts); ?> <ul> <?php while ($relatedPosts->next()): ?> <li><a href="<?php $relatedPosts->permalink(); ?>" title="<?php $relatedPosts->title(); ?>"><?php $relatedPosts->title(); ?></a></li> <?php endwhile; ?> </ul>39、侧边栏热门标签<div class="widget"> <h3><?php _e('热门标签'); ?></h3> <ul class="cate"> <?php $this->widget('Widget_Metas_Tag_Cloud', array('sort' => 'count', 'ignoreZeroCount' => true, 'desc' => true, 'limit' => 20))->to($tags); ?> <?php while($tags->next()): ?> <li><a rel="tag" href="<?php $tags->permalink(); ?>"><?php $tags->name(); ?></a></li> <?php endwhile; ?> <div class="clear"></div> </ul> </div>40、侧边栏输出所有标签<div class="widget"> <h3><?php _e('所有标签'); ?></h3> <ul class="cate"> <?php $this->widget('Widget_Metas_Tag_Cloud')->to($tags); ?> <?php while($tags->next()): ?> <li><a rel="tag" href="<?php $tags->permalink(); ?>"><?php $tags->name(); ?></a></li> <?php endwhile; ?> <div class="clear"></div> </ul> </div>41、当前文章的标签 说明:(',', true, 'none') 第一个单引号间的逗号代表标签与标签的间隔用逗号隔开,true 是标签以超链接形式输出 false 则只输出文字,none 为该文章没有标签时显示的提示信息可为空。<?php $this->tags(',', true, 'none'); ?>引申用法:如果想给每个标签套上 div 或者 span 什么的就需要这要做<div><?php $this->tags('</div><div>', true, 'none'); ?></div>判断当前标签并自定义内容<?php if( in_array('abc', $this->tags) ): ?> 文章含有abc标签就会显示这里 <?php endif; ?>判断文章是否存在标签,如果存在输出标签,如果不存在输出该文章分类<?php if( count($this->tags) == 0 ): ?> //此处的count也可改为size <?php $this->category(',', true, 'none'); ?> //文章分类 <?php else: ?> <?php $this->tags(',', true, 'none'); ?> //文章标签 <?php endif; ?>代码片段以下为代码片段及对应的调用方式;代码片段请放置于function.php中1、输出文章缩略图/** 输出文章缩略图 */ function showThumbnail($widget) { // 当文章无图片时的默认缩略图 $rand = rand(1,5); // 随机 1-5 张缩略图 $random = $widget->widget('Widget_Options')->themeUrl . '/img/sj/' . $rand . '.jpg'; // 随机缩略图路径 // $random = $widget->widget('Widget_Options')->themeUrl . '/img/mr.jpg'; // 若只想要一张默认缩略图请删除本行开头的"//" $attach = $widget->attachments(1)->attachment; $pattern = '/\<img.*?src\=\"(.*?)\"[^>]*>/i'; if (preg_match_all($pattern, $widget->content, $thumbUrl)) { echo $thumbUrl[1][0]; } else if ($attach->isImage) { echo $attach->url; } else { echo $random; } }调用方法:<?php showThumbnail($this); ?>2、获取文章第一张图片做缩略图function showThumbnail($widget) { $attach = $widget->attachments(1)->attachment; $pattern = '/\<img.*?src\=\"(.*?)\"[^>]*>/i'; if (preg_match_all($pattern, $widget->content, $thumbUrl)) { echo $thumbUrl[1][0]; else if ($attach->isImage) { echo $attach->url; } else { echo $random; } }调用方法:<img src="<?php showThumbnail($this); ?>">3、评论自动排第一function Autofirst(){ $db = Typecho_Db::get(); $query = $db->select()->from('table.comments')->where('authorId = ?','0')->order('coid',Typecho_Db::SORT_DESC)->limit(100); $result = $db->fetchAll($query); $arrUrl = array(); $arrAuthor = array(); foreach ($result as $value) { if($value["url"]!==null){ array_push($arrUrl,$value["url"]); array_push($arrAuthor,$value["author"]); } } $su=array_filter(array_merge(array_unique($arrUrl))); $sa=array_filter(array_merge(array_unique($arrAuthor))); $num=0; for($i=0;$i<count(array_unique($su));$i++){ if($su[$i]!=="" && $num<8){ $num+=1; $db1 = Typecho_Db::get(); $query1 = $db1->select()->from('table.comments')->where('url = ?',$su[$i])->order('coid',Typecho_Db::SORT_DESC)->limit(100); $result1 = $db1->fetchAll($query1); $arrAuthor1 = array(); foreach ($result1 as $value) { array_push($arrAuthor1,$value["author"]); } echo '<div class="col-lg-3 col-md-3 item"><a href="'.$su[$i].'" rel="external nofollow" class="btn btn-default btn-block overflow" target="_blank">'.$arrAuthor1[0].'</a></div>'; } } }调用方法:<?php Autofirst(100) ?>4、随机文章function getRandomPosts($limit = 10){ $db = Typecho_Db::get(); $result = $db->fetchAll($db->select()->from('table.contents') ->where('status = ?','publish') ->where('type = ?', 'post') ->where('created <= unix_timestamp(now())', 'post') ->limit($limit) ->order('RAND()') ); if($result){ $i=1; foreach($result as $val){ if($i<=3){ $var = ' class="red"'; }else{ $var = ''; } $val = Typecho_Widget::widget('Widget_Abstract_Contents')->push($val); $post_title = htmlspecialchars($val['title']); $permalink = $val['permalink']; echo '<li><i'.$var.'>'.$i.'</i><a href="'.$permalink.'" title="'.$post_title.'" target="_blank">'.$post_title.'</a></li>'; $i++; } } }调用方法:<?php getRandomPosts('10');?>5、热门文章function getHotComments($limit = 10){ $db = Typecho_Db::get(); $result = $db->fetchAll($db->select()->from('table.contents') ->where('status = ?','publish') ->where('type = ?', 'post') ->where('created <= unix_timestamp(now())', 'post') //添加这一句避免未达到时间的文章提前曝光 ->limit($limit) ->order('commentsNum', Typecho_Db::SORT_DESC) ); if($result){ foreach($result as $val){ $val = Typecho_Widget::widget('Widget_Abstract_Contents')->push($val); $post_title = htmlspecialchars($val['title']); $permalink = $val['permalink']; echo '<li><a href="'.$permalink.'" title="'.$post_title.'" target="_blank">'.$post_title.'</a></li>'; } } }调用方法:<?php getHotComments('10');?>6、文章阅读量统计function get_post_view($archive) { $cid = $archive->cid; $db = Typecho_Db::get(); $prefix = $db->getPrefix(); if (!array_key_exists('views', $db->fetchRow($db->select()->from('table.contents')))) { $db->query('ALTER TABLE `' . $prefix . 'contents` ADD `views` INT(10) DEFAULT 0;'); echo 0; return; } $row = $db->fetchRow($db->select('views')->from('table.contents')->where('cid = ?', $cid)); if ($archive->is('single')) { $db->query($db->update('table.contents')->rows(array('views' => (int) $row['views'] + 1))->where('cid = ?', $cid)); } echo $row['views']; }调用方法:<?php get_post_view($this) ?>来自: 目的地-Destination
-
Rocky Linux无缝升级 清除原有的yum,epel源等dnf -y remove rpmconf yum-utils epel-release安装最新系统的重要三个内核文件,选取自己系统适合的内核文件#Rocky Linux 9 _x64 dnf -y install https://os.iso.st/r9/minimal/Packages/rocky-release-9.1-1.10.el9.noarch.rpm https://os.iso.st/r9/minimal/Packages/rocky-repos-9.1-1.10.el9.noarch.rpm https://os.iso.st/r9/minimal/Packages/rocky-gpg-keys-9.1-1.10.el9.noarch.rpm #Rocky Linux 9 _aarch64 dnf -y install https://os.iso.st/r9arch/minimal/Packages/rocky-release-9.1-1.10.el9.noarch.rpm https://os.iso.st/r9arch/minimal/Packages/rocky-repos-9.1-1.10.el9.noarch.rpm https://os.iso.st/r9arch/minimal/Packages/rocky-gpg-keys-9.1-1.10.el9.noarch.rpm显示下面内容即可进行下一步 Cleanup : rocky-gpg-keys-8.6-3.el8.noarch 6/6 Running scriptlet: rocky-gpg-keys-8.6-3.el8.noarch 6/6 Line is not an assignment at '/usr/lib/sysctl.d/50-redhat.conf:8': (null) Couldn't write '1' to 'net/ipv4/conf/*/rp_filter', ignoring: No such file or directory warning: %transfiletriggerin(systemd-239-58.el8.x86_64) scriptlet failed, exit status 1 Error in <unknown> scriptlet in rpm package rocky-gpg-keys Verifying : rocky-release-9.1-1.10.el9.noarch 1/6 Verifying : rocky-release-8.6-3.el8.noarch 2/6 Verifying : rocky-repos-9.1-1.10.el9.noarch 3/6 Verifying : rocky-repos-8.6-3.el8.noarch 4/6 Verifying : rocky-gpg-keys-9.1-1.10.el9.noarch 5/6 Verifying : rocky-gpg-keys-8.6-3.el8.noarch 6/6 Upgraded: rocky-gpg-keys-9.1-1.10.el9.noarch rocky-release-9.1-1.10.el9.noarch rocky-repos-9.1-1.10.el9.noarch Complete! [root@iZuf6g ~]#升级Rocky Linuxdnf -y --releasever=9 --allowerasing --setopt=deltarpm=false distro-synccentos stream9 --releaserver=9-stream 结束后可能会出现以下两个错误,需进行处理,其他错误自行参考解决,或者留言进行辅助解决①:file /usr/share/redhat-logos ... el8 ...el9类似的长文。此错误表示原有的文件和el9不兼容,删除该目录即可,稍后会自动生成创建。rm -rf /usr/share/redhat-logos②:file ...epel-rpm-macros-systemd.el8 ... el9类似的长文,等同上述,存在兼容问题,卸载稍后重装即可。dnf remove -y epel-rpm-macros-systemd等待结束后显示下面内容即表示已升级成功。 python3-librepo-1.14.2-3.el9.x86_64 python3-packaging-20.9-5.el9.noarch python3-subscription-manager-rhsm-1.29.30.1-1.el9_1.x86_64 rpm-sign-libs-4.16.1.3-19.el9_1.x86_64 rsyslog-logrotate-8.2102.0-105.el9.x86_64 sombok-2.4.0-16.el9.x86_64 subscription-manager-1.29.30.1-1.el9_1.x86_64 subscription-manager-rhsm-certificates-20220623-1.el9.noarch sysprof-capture-devel-3.40.1-3.el9.x86_64 systemd-rpm-macros-250-12.el9_1.3.noarch usermode-1.114-4.el9.x86_64 userspace-rcu-0.12.1-6.el9.x86_64 util-linux-core-2.37.4-9.el9.x86_64 webkit2gtk3-jsc-2.36.7-1.el9_1.2.x86_64 xml-common-0.6.3-58.el9.noarch zstd-1.5.1-2.el9.x86_64 Removed: gcc-toolset-10-10.1-0.el8.x86_64 gcc-toolset-10-annobin-9.29-2.el8.3.x86_64 gcc-toolset-10-dyninst-10.2.1-2.el8.x86_64 gcc-toolset-10-gcc-10.3.1-1.2.el8_5.x86_64 gcc-toolset-10-gcc-c++-10.3.1-1.2.el8_5.x86_64 gcc-toolset-10-gcc-gdb-plugin-10.3.1-1.2.el8_5.x86_64 gcc-toolset-10-gcc-gfortran-10.3.1-1.2.el8_5.x86_64 gcc-toolset-10-gdb-9.2-4.el8.x86_64 gcc-toolset-10-libquadmath-devel-10.3.1-1.2.el8_5.x86_64 gcc-toolset-10-perftools-10.1-0.el8.x86_64 gcc-toolset-10-systemtap-4.4-5.el8.x86_64 gcc-toolset-10-systemtap-client-4.4-5.el8.x86_64 gcc-toolset-10-systemtap-devel-4.4-5.el8.x86_64 gcc-toolset-10-systemtap-runtime-4.4-5.el8.x86_64 gcc-toolset-10-toolchain-10.1-0.el8.x86_64 gdbm-1:1.18-1.el8.x86_64 guile-5:2.0.14-7.el8.x86_64 libtirpc-devel-1.1.4-8.el8.x86_64 libzip-devel-1.5.1-2.module+el8.4.0+413+c9202dda.x86_64 ncurses-compat-libs-6.1-9.20180224.el8.x86_64 oniguruma-devel-6.8.2-2.el8.x86_64 perl-B-Debug-1.26-2.el8.noarch perl-Locale-Codes-3.57-1.el8.noarch perl-Pod-Parser-1.63-396.el8.noarch python3-html5lib-1:0.999999999-6.el8.noarch python3-pydbus-0.6.0-5.el8.noarch python3-slip-0.6.4-11.el8.noarch python3-slip-dbus-0.6.4-11.el8.noarch python3-webencodings-0.5.1-6.el8.noarch python36-3.6.8-38.module+el8.5.0+671+195e4563.x86_64 python36-devel-3.6.8-38.module+el8.5.0+671+195e4563.x86_64 redhat-lsb-core-4.1-47.el8.x86_64 Complete! [root@iZuf6g ~]#升级成功后,卸载已存在旧的内核。先查看最新内核是否已经安装查看已存在的内核,最新的内核应该为5.xrpm -qa | grep kernel输出如下:[root@iZuf6g ~]# rpm -qa | grep kernel warning: Found bdb_ro Packages database while attempting sqlite backend: using bdb_ro backend. kernel-devel-5.14.0-162.18.1.el9_1.x86_64 kernel-srpm-macros-1.0-11.el9.noarch kernel-core-5.14.0-162.18.1.el9_1.x86_64 kernel-headers-5.14.0-162.18.1.el9_1.x86_64 kernel-tools-libs-5.14.0-162.18.1.el9_1.x86_64 kernel-devel-4.18.0-372.9.1.el8.x86_64 kernel-modules-5.14.0-162.18.1.el9_1.x86_64 kernel-modules-4.18.0-372.9.1.el8.x86_64 kernel-tools-5.14.0-162.18.1.el9_1.x86_64 kernel-4.18.0-372.9.1.el8.x86_64 kernel-core-4.18.0-372.9.1.el8.x86_64 kernel-5.14.0-162.18.1.el9_1.x86_64 [root@iZuf6g4xzntqr7ucc5swmkZ ~]#上面出现警告,我们需要重建rpm仓库cd /var/lib/rpm rm -f __db.00* rpm --rebuilddb重新运行即可正常,输出存在5.x内核的可以直接卸载旧内核rpm -e --nodeps `rpm -qa|grep -i kernel|grep 4.18`输出没有5.x内核的进行内核安装再卸载即可dnf -y install kernel kernel-core shim执行dnf命令时,会有如下报错Last metadata expiration check: 0:01:17 ago on Wed 22 Mar 2023 06:55:50 PM CST. Modular dependency problems: Problem 1: conflicting requests - nothing provides module(platform:el8) needed by module httpd:2.4:8070020230221173330:3b9f49c4.x86_64 Problem 2: conflicting requests - nothing provides module(platform:el8) needed by module nginx:1.14:8040020210610090123:9f9e2e7e.x86_64 Problem 3: conflicting requests - nothing provides module(platform:el8) needed by module perl:5.26:8050020211109115414:b4937e53.x86_64 Problem 4: conflicting requests - nothing provides module(platform:el8) needed by module perl-IO-Socket-SSL:2.066:8060020220513050719:bc93984d.x86_64 Problem 5: conflicting requests - nothing provides module(platform:el8) needed by module perl-libwww-perl:6.34:8060020220513153220:9168a43d.x86_64 Problem 6: conflicting requests - nothing provides module(platform:el8) needed by module php:7.2:8040020210530192442:02bae935.x86_64 Problem 7: conflicting requests - nothing provides module(platform:el8) needed by module python36:3.6:8050020211109130820:982725ab.x86_64 Problem 8: conflicting requests - nothing provides module(platform:el8) needed by module virt:rhel:8070020230221174740:3b9f49c4.x86_64 Dependencies resolved. Nothing to do. Complete!将它禁用即可(禁用后重启会自动删除这些不存在的模块),禁用时记得带着版本。dnf module disable httpd:2.4 nginx:1.14 perl:5.26 perl-IO-Socket-SSL:2.066 perl-libwww-perl:6.34 php:7.2 python36:3.6再次执行dnf即可正常系统升级完毕,重启使最新内核生效即可dnf update -y reboot
-
Linux内核升级 查看当前内核版本使用uname命令查看内核版本,其中-a选项输出信息更为详细。# uname -a Linux ibetterlife 5.14.0-162.18.1.el9_1.x86_64 #1 SMP PREEMPT_DYNAMIC Wed Mar 1 22:02:24 UTC 2023 x86_64 x86_64 x86_64 GNU/Linux # uname -r 5.14.0-162.18.1.el9_1.x86_64启用 ELRepoELRepo是企业Linux软件包的RPM存储库。ELRepo支持Red Hat Enterprise Linux (RHEL) 及其衍生产品,如Scientific Linux、CentOS Linux、Alma Linux 和 Rocky Linux。ELRepo项目专注于与硬件相关的软件包,以增强您对Enterprise Linux 的体验。这包括文件系统驱动程序、图形驱动程序、网络驱动程序、声音驱动程序、网络摄像头和视频驱动程序。从CentOS/AlmaLinux/RockLinux 8开始,ELRepo已经加入到官方软件仓库中,名称为 “elrepo-release”。启用ELRepo只需要执行命令:dnf -y install elrepo-release安装ELRepo公钥rpm --import https://www.elrepo.org/RPM-GPG-KEY-elrepo.orgELRepo rpm包在线安装方法# Import the public key: rpm --import https://www.elrepo.org/RPM-GPG-KEY-elrepo.org # To install ELRepo for RHEL-**9** or CentOS-**9**: yum install https://www.elrepo.org/elrepo-release-9.el9.elrepo.noarch.rpm # To install ELRepo for RHEL-**8** or CentOS-**8**: yum install https://www.elrepo.org/elrepo-release-8.el8.elrepo.noarch.rpm # To install ELRepo for RHEL-**7**, SL-**7** or CentOS-**7**: yum install https://www.elrepo.org/elrepo-release-7.el7.elrepo.noarch.rpm # To make use of our mirror system, **please also install yum-plugin-fastestmirror**.升级内核查询ELRepo中的kernel版本# yum --disablerepo="*" --enablerepo="elrepo-kernel" list available Last metadata expiration check: 0:21:04 ago on Wed 22 Mar 2023 04:10:15 PM CST. Available Packages bpftool.x86_64 6.2.7-1.el9.elrepo elrepo-kernel kernel-ml.x86_64 6.2.7-1.el9.elrepo elrepo-kernel kernel-ml-core.x86_64 6.2.7-1.el9.elrepo elrepo-kernel kernel-ml-devel.x86_64 6.2.7-1.el9.elrepo elrepo-kernel kernel-ml-devel-matched.x86_64 6.2.7-1.el9.elrepo elrepo-kernel kernel-ml-doc.noarch 6.2.7-1.el9.elrepo elrepo-kernel kernel-ml-headers.x86_64 6.2.7-1.el9.elrepo elrepo-kernel kernel-ml-modules.x86_64 6.2.7-1.el9.elrepo elrepo-kernel kernel-ml-modules-extra.x86_64 6.2.7-1.el9.elrepo elrepo-kernel kernel-ml-tools.x86_64 6.2.7-1.el9.elrepo elrepo-kernel kernel-ml-tools-libs.x86_64 6.2.7-1.el9.elrepo elrepo-kernel kernel-ml-tools-libs-devel.x86_64 6.2.7-1.el9.elrepo elrepo-kernel perf.x86_64 6.2.7-1.el9.elrepo elrepo-kernel python3-perf.x86_64 6.2.7-1.el9.elrepo elrepo-kernel # yum --disablerepo="*" --enablerepo="elrepo-kernel" list available --showduplicates Last metadata expiration check: 0:44:46 ago on Wed 22 Mar 2023 04:10:15 PM CST. Available Packages bpftool.x86_64 6.2.6-1.el9.elrepo elrepo-kernel bpftool.x86_64 6.2.7-1.el9.elrepo elrepo-kernel elrepo-release.noarch 9.1-1.el9.elrepo elrepo-kernel kernel-ml.x86_64 6.2.6-1.el9.elrepo elrepo-kernel kernel-ml.x86_64 6.2.7-1.el9.elrepo elrepo-kernel kernel-ml-core.x86_64 6.2.6-1.el9.elrepo elrepo-kernel kernel-ml-core.x86_64 6.2.7-1.el9.elrepo elrepo-kernel kernel-ml-devel.x86_64 6.2.6-1.el9.elrepo elrepo-kernel kernel-ml-devel.x86_64 6.2.7-1.el9.elrepo elrepo-kernel kernel-ml-devel-matched.x86_64 6.2.6-1.el9.elrepo elrepo-kernel kernel-ml-devel-matched.x86_64 6.2.7-1.el9.elrepo elrepo-kernel kernel-ml-doc.noarch 6.2.6-1.el9.elrepo elrepo-kernel kernel-ml-doc.noarch 6.2.7-1.el9.elrepo elrepo-kernel kernel-ml-headers.x86_64 6.2.6-1.el9.elrepo elrepo-kernel kernel-ml-headers.x86_64 6.2.7-1.el9.elrepo elrepo-kernel kernel-ml-modules.x86_64 6.2.6-1.el9.elrepo elrepo-kernel kernel-ml-modules.x86_64 6.2.7-1.el9.elrepo elrepo-kernel kernel-ml-modules-extra.x86_64 6.2.6-1.el9.elrepo elrepo-kernel kernel-ml-modules-extra.x86_64 6.2.7-1.el9.elrepo elrepo-kernel kernel-ml-tools.x86_64 6.2.6-1.el9.elrepo elrepo-kernel kernel-ml-tools.x86_64 6.2.7-1.el9.elrepo elrepo-kernel kernel-ml-tools-libs.x86_64 6.2.6-1.el9.elrepo elrepo-kernel kernel-ml-tools-libs.x86_64 6.2.7-1.el9.elrepo elrepo-kernel kernel-ml-tools-libs-devel.x86_64 6.2.6-1.el9.elrepo elrepo-kernel kernel-ml-tools-libs-devel.x86_64 6.2.7-1.el9.elrepo elrepo-kernel perf.x86_64 6.2.6-1.el9.elrepo elrepo-kernel perf.x86_64 6.2.7-1.el9.elrepo elrepo-kernel python3-perf.x86_64 6.2.6-1.el9.elrepo elrepo-kernel python3-perf.x86_64 6.2.7-1.el9.elrepo elrepo-kernel术语解释 kernel-ml kernel-ml中的ml是英文 “mainline stable” 的缩写,elrepo-kernel中列出来的是最新的稳定主线版本。 kernel-lt kernel-lt中的lt是英文 “long term support” 的缩写,elrepo-kernel 中列出来的长期支持版本。安装kernel安装新内核(kernel-core、kernel-modules 与 kernel 依赖自动更新)# yum --disablerepo=\* --enablerepo=elrepo-kernel install -y kernel-ml.x86_64 安装新内核相关软件(--skip-broken必须) # yum --disablerepo=\* --enablerepo=elrepo-kernel install -y kernel-ml-devel kernel-ml-tools kernel-ml-tools-libs kernel-ml-tools-libs-devel kernel-ml-headers --skip-broken确认默认启动内核(般更新的内核为默认启动内核)# grubby --default-kernel /boot/vmlinuz-6.2.7-1.el9.elrepo.x86_64如果不是的话,先看查看系统安装的全部内核# grubby --default-kernel /boot/vmlinuz-6.2.7-1.el9.elrepo.x86_64 [root@iZuf6g4xzntqr7ucc5swmkZ ~]# grubby --info=ALL index=0 kernel="/boot/vmlinuz-6.2.7-1.el9.elrepo.x86_64" args="ro rhgb quiet net.ifnames=0 console=tty0 console=ttyS0,115200n8 nvme_core.io_timeout=4294967295 nvme_core.admin_timeout=4294967295 crashkernel=1G-4G:192M,4G-64G:256M,64G-:512M $tuned_params" root="UUID=8537de8b-6254-450c-9946-5ff5ad4af6dc" initrd="/boot/initramfs-6.2.7-1.el9.elrepo.x86_64.img $tuned_initrd" title="Rocky Linux (6.2.7-1.el9.elrepo.x86_64) 9.1 (Blue Onyx)" id="20220630095603711861013686113992-6.2.7-1.el9.elrepo.x86_64" index=1 kernel="/boot/vmlinuz-5.14.0-162.18.1.el9_1.x86_64" args="ro rhgb quiet net.ifnames=0 console=tty0 console=ttyS0,115200n8 nvme_core.io_timeout=4294967295 nvme_core.admin_timeout=4294967295 $tuned_params crashkernel=1G-4G:192M,4G-64G:256M,64G-:512M" root="UUID=8537de8b-6254-450c-9946-5ff5ad4af6dc" initrd="/boot/initramfs-5.14.0-162.18.1.el9_1.x86_64.img $tuned_initrd" title="Rocky Linux (5.14.0-162.18.1.el9_1.x86_64) 9.1 (Blue Onyx)" id="20220630095603711861013686113992-5.14.0-162.18.1.el9_1.x86_64" index=2 kernel="/boot/vmlinuz-0-rescue-20220630095603711861013686113992" args="ro rhgb quiet net.ifnames=0 console=tty0 console=ttyS0,115200n8 nvme_core.io_timeout=4294967295 nvme_core.admin_timeout=4294967295 crashkernel=1G-4G:192M,4G-64G:256M,64G-:512M" root="UUID=8537de8b-6254-450c-9946-5ff5ad4af6dc" initrd="/boot/initramfs-0-rescue-20220630095603711861013686113992.img" title="Rocky Linux (0-rescue-20220630095603711861013686113992) 8.6 (Green Obsidian)" id="20220630095603711861013686113992-0-rescue"设置新的默认启动内核# grubby --set-default=/boot/vmlinuz-6.2.7-1.el9.elrepo.x86_64 或者 # grubby --set-default-index=0重启之后,再次查看内核版本# uname -a Linux iZuf6g4xzntqr7ucc5swmkZ 5.14.0-162.18.1.el9_1.x86_64 #1 SMP PREEMPT_DYNAMIC Wed Mar 1 22:02:24 UTC 2023 x86_64 x86_64 x86_64 GNU/Linux # uname -r 6.2.7-1.el9.elrepo.x86_64删除旧内核(可选的)# rpm -e --nodeps `rpm -qa|grep -i kernel|grep 5.14`再次查看当前的内核,检查是否删除成功。# rpm -qa | grep kernel kernel-srpm-macros-1.0-11.el9.noarch kernel-ml-core-6.2.7-1.el9.elrepo.x86_64 kernel-ml-modules-6.2.7-1.el9.elrepo.x86_64 kernel-ml-6.2.7-1.el9.elrepo.x86_64
-
-
-
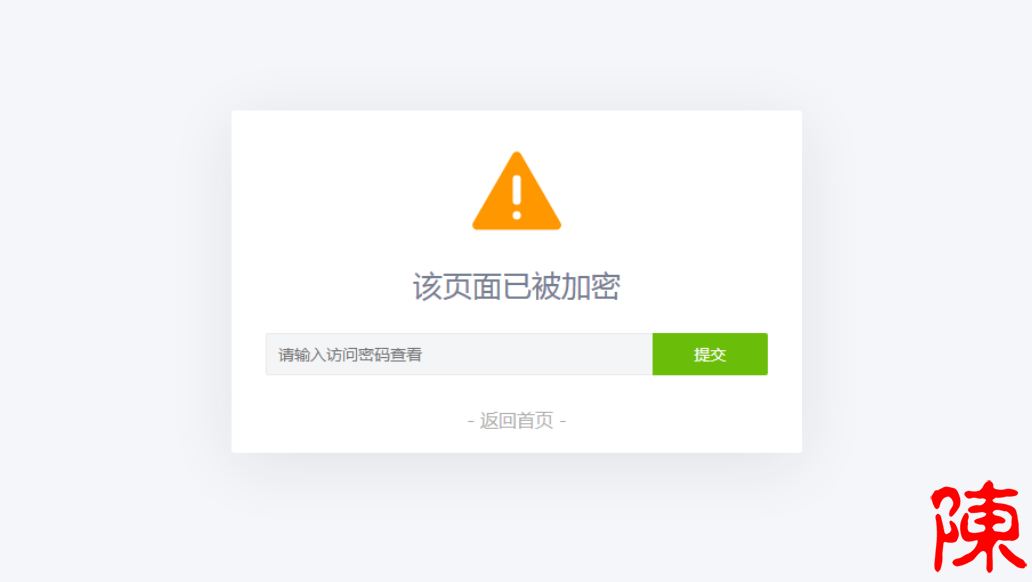
PHP为任意页面设访问密码,控制登录 使用方法,把下面的代码存为php文件,下面的整段代码是验证过程,然后在你入口页进行调用例如命名为MkEncrypt.php,那么在入口页进行require_once('MkEncrypt.php');然后设置密码为MkEncrypt('1234');此时密码为1234则密码正确才能进去页面,进入后会存下cookies值,下一次登录的时候则不需要再次输入了代码简介为你的页面支持加密访问,无论什么程序,只要是PHP程序,都是支持这代码的,来实现加密访问你的加密页面或文章等等的页面,不保证其他程序可以正常使用代码如下<?php /******************************************** * 使用方法: * * 1、将本段代码保存为 MkEncrypt.php * * 2、在要加密的页面前面引入这个 php 文件 * require_once('MkEncrypt.php'); * * 3、设置页面访问密码 * MkEncrypt('页面密码'); * ********************************************/ // 密码 Cookie 加密盐 if(!defined('MK_ENCRYPT_SALT')) define('MK_ENCRYPT_SALT', 'Kgs$JC!V'); /** * 设置访问密码 * * @param $password 访问密码 * @param $pageid 页面唯一 ID 值,用于区分同一网站的不同加密页面 */ function MkEncrypt($password, $pageid = 'default') { $pageid = md5($pageid); $md5pw = md5(md5($password).MK_ENCRYPT_SALT); $postpwd = isset($_POST['pagepwd']) ? addslashes(trim($_POST['pagepwd'])) : ''; $cookiepwd = isset($_COOKIE['mk_encrypt_'.$pageid]) ? addslashes(trim($_COOKIE['mk_encrypt_'.$pageid])) : ''; if($cookiepwd == $md5pw) return; // Cookie密码验证正确 if($postpwd == $password) { // 提交的密码正确 setcookie('mk_encrypt_' . $pageid, $md5pw, time() + 3600000, '/'); return; } ?> <html> <head> <meta http-equiv="Content-Type" content="text/html; charset=UTF-8"> <meta charset="UTF-8"> <meta http-equiv="X-UA-Compatible" content="IE=edge"> <meta name="renderer" content="webkit"> <meta name="author" content="mengkun"> <meta name="viewport" content="width=device-width, initial-scale=1.0, minimum-scale=1.0, maximum-scale=1.0, user-scalable=no"> <title>该页面已被加密</title> <style type="text/css"> *{font-family:"Microsoft Yahei",微软雅黑,"Helvetica Neue",Helvetica,"Hiragino Sans GB","WenQuanYi Micro Hei",sans-serif;box-sizing:border-box;margin:0px;padding:0px;font-size:14px;-webkit-transition:.2s;-moz-transition:.2s;-ms-transition:.2s;-o-transition:.2s;transition:.2s} html,body{width:100%;height:100%} body{background-color:#F4F6F9;color:#768093} input,button{font-size:1em;border-radius:3px;-webkit-appearance:none} input{width:100%;padding:5px;box-sizing:border-box;border:1px solid #e5e9ef;background-color:#f4f5f7;resize:vertical} input:focus{background-color:#fff;outline:none} button{border:0;background:#6abd09;color:#fff;cursor:pointer;opacity:1;user-select:none} button:hover,button:focus{opacity:.9} button:active{opacity:1} .main{width:100%;max-width:500px;height:300px;padding:30px;background-color:#fff;border-radius:2px;box-shadow:0 10px 60px 0 rgba(29,29,31,0.09);transition:all .12s ease-out;position:absolute;left:0;top:0;bottom:0;right:0;margin:auto;text-align:center} .alert{width:80px} .mk-side-form{margin-bottom:28px} .mk-side-form input{float:left;padding:2px 10px;width:77%;height:37px;border:1px solid #ebebeb;border-right-color:transparent;border-radius:2px 0 0 2px;line-height:37px} .mk-side-form button{position:relative;overflow:visible;width:23%;height:37px;border-radius:0 2px 2px 0;text-transform:uppercase} .pw-tip{font-weight:normal;font-size:26px;text-align:center;margin:25px auto} #pw-error {color: red;margin-top: 15px;margin-bottom: -20px;} .return-home{text-decoration:none;color:#b1b1b1;font-size:16px} .return-home:hover{color:#1E9FFF;letter-spacing:5px} </style> </head> <body> <div class="main"> <svg class="alert" viewBox="0 0 1084 1024" xmlns="http://www.w3.org/2000/svg" width="80" height="80"> <defs><style/></defs> <path d="M1060.744 895.036L590.547 80.656a55.959 55.959 0 0 0-96.919 0L22.588 896.662a55.959 55.959 0 0 0 48.43 83.907h942.14a55.959 55.959 0 0 0 47.525-85.534zm-470.619-85.172a48.008 48.008 0 1 1-96.015 0v-1.567a48.008 48.008 0 1 1 96.015 0v1.567zm0-175.345a48.008 48.008 0 1 1-96.015 0V379.362a48.008 48.008 0 1 1 96.015 0v255.157z" fill="#FF9800"/> </svg> <form action="" method="post" class="mk-side-form"> <h2 class="pw-tip">该页面已被加密</h2> <input type="password" name="pagepwd" placeholder="请输入访问密码查看" required><button type="submit">提交</button> <?php if($postpwd): ?> <p id="pw-error">Oops!密码不对哦~</p> <script>setTimeout(function() {document.getElementById("pw-error").style.display = "none"}, 2000);</script> <?php endif; ?> </form> <a href="/" class="return-home" title="点击回到网站首页">- 返回首页 - </a> </div> </body> </html> <?php exit(); }转载自:小灯泡设计
-
利用现有在使用的Typecho主题Joe创建欢迎引导页 Typecho有很多人在使用,利用独立页面功能可以创建有个性的欢迎引导页,首先在主题文件夹内新建一个*.php文件,例如现在本站使用的是Typecho主题Joe,我们可以借用已有的主题内的自定义模板文件,将文件头部代码修改为:<?php /** * 欢迎页 * * @package custom * **/ ?>然后在主题自定义模板文件的与之间的代码修改为下列代码 <link rel="stylesheet" type="text/css" href="./img/style.css"> <div class="content"> <div class="title">小陈之家Chen CYH</div> <hr class="hr"> <div class="discription">盛年不重来,一日难再晨。及时当勉励,岁月不待人。</div> <hr class="hr"> <nav class="cover-navigation cover-navigation--primary"> <ul class="navigation"> <li class="navigation__item"><a href="/archive" target="_self" title="我的文章">浏览</a></li> <li class="navigation__item"><a href="/link.html" target="_blank" title="我的友链">友链</a></li> <li class="navigation__item"><a href="/wallpaper.html" target="_blank" title="我的壁纸">壁纸</a></li> <li class="navigation__item"><a href="/archives.html" target="_blank" title="我的归档">归档</a></li> <li class="navigation__item"><a href="https://yunhe.life/" target="_blank" title="我的相册">相册</a></li> <li class="navigation__item"><a href="/about.html" target="_blank" title="关于站长">关于</a></li> </ul> </nav> <div class="item"> <?php $this->options->JFooter_Left() ?> </div> <?php if ($this->options->JBirthDay) : ?> <div class="item run"> <span>已运行 <strong class="joe_run__day">00</strong> 天 <strong class="joe_run__hour">00</strong> 时 <strong class="joe_run__minute">00</strong> 分 <strong class="joe_run__second">00</strong> 秒</span> </div> <?php endif; ?> <div class="item"> <?php $this->options->JFooter_Right() ?> </div> </div> <div class="landscape"></div> <div class="filter"></div> <canvas id="canvas" width="1536" height="746"></canvas> <script type="text/javascript" src="./img/sky.js"></script> <div id="detect-holmes-debugger-1541053963293"> </div>其中,代码 <div class="item"> <?php $this->options->JFooter_Left() ?> </div> <?php if ($this->options->JBirthDay) : ?> <div class="item run"> <span>已运行 <strong class="joe_run__day">00</strong> 天 <strong class="joe_run__hour">00</strong> 时 <strong class="joe_run__minute">00</strong> 分 <strong class="joe_run__second">00</strong> 秒</span> </div> <?php endif; ?> <div class="item"> <?php $this->options->JFooter_Right() ?> </div>拷贝的是Joe主题的footer中的代码,如果不需要的话可以去掉该段代码上述代码中的“./img/style.css”和“./img/sky.js”是style.css和sky.js这两个文件所放置的位置style.css代码如下:html, body { margin: 0; overflow: hidden; width: 100%; height: 100%; background: black; background: linear-gradient(to bottom, #000000 0%, #5788fe 100%); font-family:'Questrial','Noto Serif SC' ; } .filter { width: 100%; height: 100%; position: absolute; top: 0; left: 0; background: #fe5757; animation: colorChange 30s ease-in-out infinite; animation-fill-mode: both; mix-blend-mode: overlay; } @keyframes colorChange { 0%, 100% { opacity: 0; } 50% { opacity: .9; } } .landscape { position: absolute; bottom: 0px; left: 0; width: 100%; height: 100%; background-image: url('../img/xkbg.png'); background-size: 1000px 250px; background-repeat: repeat-x; background-position: center bottom; } .content{ -moz-user-select: none; -webkit-user-select: none; -ms-user-select: none; -khtml-user-select: none; user-select: none; text-align: center; color: #fff; position: absolute; left: 50%; top: 45%; transform: translate(-50%,-50%); z-index:9999 } .content .title{ margin: 15px 0; font-size: 2.5em; letter-spacing: 4px; color: #FFF; } .content .hr{ width: 50%; margin: 20px auto; border: none; border-top: 1px solid rgba(255, 255, 255, 1); height: 1px; } .content .discription{ font-size: 20px; margin: 20px; } .cover-navigation { margin: 30px; } nav { display: inline-block; position: relative; } .navigation { display: inline-block; position: relative; margin: 0; list-style-type: none; } .navigation__item { display: inline-block; line-height: 1em; padding: 1em 0; } .navigation__item a { position: relative; color: #FFF; opacity: .8; transition: all .3s; padding: 10px 20px; border: 1px solid #fff; border-radius: 20px; font-size: .9em; font-weight: bold; letter-spacing: 1px; text-shadow: none; -webkit-font-smoothing: antialiased; text-decoration: none; } .navigation__item a:hover { color: #FFF; background: #FF7F00; border-color: #FF7F00; opacity: 1; transition: all .3s; } ol, ul { list-style: none; margin: 0; padding: 0; border: 0; font-size: 100%; font: inherit; vertical-align: baseline; } .icp{ margin: 20px; } .icpnum{ color: #fff; text-decoration: none; } .item{ margin: 20px; } .item run{ color: #fff; text-decoration: none; }xkbg.png是引导页的星空背景图,星空背景图 sky.js代码内容如下:function Star(id, x, y) { this.id = id; this.x = x; this.y = y; this.r = Math.floor(Math.random() * 2) + 1; var alpha = (Math.floor(Math.random() * 10) + 1) / 10 / 2; this.color = "rgba(255,255,255," + alpha + ")"; } Star.prototype.draw = function() { ctx.fillStyle = this.color; ctx.shadowBlur = this.r * 2; ctx.beginPath(); ctx.arc(this.x, this.y, this.r, 0, 2 * Math.PI, false); ctx.closePath(); ctx.fill(); } Star.prototype.move = function() { this.y -= .15; if (this.y <= -10) this.y = HEIGHT + 10; this.draw(); } Star.prototype.die = function() { stars[this.id] = null; delete stars[this.id]; } function Dot(id, x, y, r) { this.id = id; this.x = x; this.y = y; this.r = Math.floor(Math.random() * 5) + 1; this.maxLinks = 2; this.speed = .5; this.a = .5; this.aReduction = .005; this.color = "rgba(255,255,255," + this.a + ")"; this.linkColor = "rgba(255,255,255," + this.a / 4 + ")"; this.dir = Math.floor(Math.random() * 140) + 200; } Dot.prototype.draw = function() { ctx.fillStyle = this.color; ctx.shadowBlur = this.r * 2; ctx.beginPath(); ctx.arc(this.x, this.y, this.r, 0, 2 * Math.PI, false); ctx.closePath(); ctx.fill(); } Dot.prototype.link = function() { if (this.id == 0) return; var previousDot1 = getPreviousDot(this.id, 1); var previousDot2 = getPreviousDot(this.id, 2); var previousDot3 = getPreviousDot(this.id, 3); if (!previousDot1) return; ctx.strokeStyle = this.linkColor; ctx.moveTo(previousDot1.x, previousDot1.y); ctx.beginPath(); ctx.lineTo(this.x, this.y); if (previousDot2 != false) ctx.lineTo(previousDot2.x, previousDot2.y); if (previousDot3 != false) ctx.lineTo(previousDot3.x, previousDot3.y); ctx.stroke(); ctx.closePath(); } function getPreviousDot(id, stepback) { if (id == 0 || id - stepback < 0) return false; if (typeof dots[id - stepback] != "undefined") return dots[id - stepback]; else return false; //getPreviousDot(id - stepback); } Dot.prototype.move = function() { this.a -= this.aReduction; if (this.a <= 0) { this.die(); return } this.color = "rgba(255,255,255," + this.a + ")"; this.linkColor = "rgba(255,255,255," + this.a / 4 + ")"; this.x = this.x + Math.cos(degToRad(this.dir)) * this.speed, this.y = this.y + Math.sin(degToRad(this.dir)) * this.speed; this.draw(); this.link(); } Dot.prototype.die = function() { dots[this.id] = null; delete dots[this.id]; } var canvas = document.getElementById('canvas'), ctx = canvas.getContext('2d'), WIDTH, HEIGHT, mouseMoving = false, mouseMoveChecker, mouseX, mouseY, stars = [], initStarsPopulation = 80, dots = [], dotsMinDist = 2, maxDistFromCursor = 50; setCanvasSize(); init(); function setCanvasSize() { WIDTH = document.documentElement.clientWidth, HEIGHT = document.documentElement.clientHeight; canvas.setAttribute("width", WIDTH); canvas.setAttribute("height", HEIGHT); } function init() { ctx.strokeStyle = "white"; ctx.shadowColor = "white"; for (var i = 0; i < initStarsPopulation; i++) { stars[i] = new Star(i, Math.floor(Math.random() * WIDTH), Math.floor(Math.random() * HEIGHT)); //stars[i].draw(); } ctx.shadowBlur = 0; animate(); } function animate() { ctx.clearRect(0, 0, WIDTH, HEIGHT); for (var i in stars) { stars[i].move(); } for (var i in dots) { dots[i].move(); } drawIfMouseMoving(); requestAnimationFrame(animate); } window.onmousemove = function(e) { mouseMoving = true; mouseX = e.clientX; mouseY = e.clientY; clearInterval(mouseMoveChecker); mouseMoveChecker = setTimeout(function() { mouseMoving = false; }, 100); } function drawIfMouseMoving() { if (!mouseMoving) return; if (dots.length == 0) { dots[0] = new Dot(0, mouseX, mouseY); dots[0].draw(); return; } var previousDot = getPreviousDot(dots.length, 1); var prevX = previousDot.x; var prevY = previousDot.y; var diffX = Math.abs(prevX - mouseX); var diffY = Math.abs(prevY - mouseY); if (diffX < dotsMinDist || diffY < dotsMinDist) return; var xVariation = Math.random() > .5 ? -1 : 1; xVariation = xVariation * Math.floor(Math.random() * maxDistFromCursor) + 1; var yVariation = Math.random() > .5 ? -1 : 1; yVariation = yVariation * Math.floor(Math.random() * maxDistFromCursor) + 1; dots[dots.length] = new Dot(dots.length, mouseX + xVariation, mouseY + yVariation); dots[dots.length - 1].draw(); dots[dots.length - 1].link(); } //setInterval(drawIfMouseMoving, 17); function degToRad(deg) { return deg * (Math.PI / 180); }修改完成后,欢迎引导页完整代码见下:<?php /** * 欢迎页 * * @package custom * **/ ?> <!DOCTYPE html> <html lang="zh-CN"> <head> <?php $this->need('public/include.php'); ?> <meta http-equiv="Content-Type" content="text/html; charset=UTF-8"> <meta http-equiv="X-UA-Compatible" content="IE=edge,chrome=1"> <meta name="viewport" content="width=device-width, initial-scale=1, maximum-scale=11" id="mixia_vpid"> <?php echo $this->is('post') ? 'current' : '' ?>"> </head> <body> <link rel="stylesheet" type="text/css" href="./img/style.css"> <div class="content"> <div class="title">小陈之家Chen CYH</div> <hr class="hr"> <div class="discription">盛年不重来,一日难再晨。及时当勉励,岁月不待人。</div> <hr class="hr"> <nav class="cover-navigation cover-navigation--primary"> <ul class="navigation"> <li class="navigation__item"><a href="/archive" target="_self" title="我的文章">浏览</a></li> <li class="navigation__item"><a href="/link.html" target="_blank" title="我的友链">友链</a></li> <li class="navigation__item"><a href="/wallpaper.html" target="_blank" title="我的壁纸">壁纸</a></li> <li class="navigation__item"><a href="/archives.html" target="_blank" title="我的归档">归档</a></li> <li class="navigation__item"><a href="https://yunhe.life/" target="_blank" title="我的相册">相册</a></li> <li class="navigation__item"><a href="/about.html" target="_blank" title="关于站长">关于</a></li> </ul> </nav> <div class="item"> <?php $this->options->JFooter_Left() ?> </div> <?php if ($this->options->JBirthDay) : ?> <div class="item run"> <span>已运行 <strong class="joe_run__day">00</strong> 天 <strong class="joe_run__hour">00</strong> 时 <strong class="joe_run__minute">00</strong> 分 <strong class="joe_run__second">00</strong> 秒</span> </div> <?php endif; ?> <div class="item"> <?php $this->options->JFooter_Right() ?> </div> </div> <div class="landscape"></div> <div class="filter"></div> <canvas id="canvas" width="1536" height="746"></canvas> <script type="text/javascript" src="./img/sky.js"></script> <div id="detect-holmes-debugger-1541053963293"> </div> </body> </html>最终效果:
-
新年倒计时代码 <style type="text/css"> .deng-box{position:fixed;top:-40px;right:-20px;z-index:9999;pointer-events:none} .deng-box1{position:fixed;top:-30px;right:10px;z-index:9999;pointer-events:none} .deng-box2{position:fixed;top:-40px;left:-20px;z-index:9999;pointer-events:none} .deng-box3{position:fixed;top:-30px;left:10px;z-index:9999;pointer-events:none} .deng-box1 .deng,.deng-box3 .deng{position:relative;width:120px;height:90px;margin:50px;background:#d8000f;background:rgba(216,0,15,.8);border-radius:50% 50%;-webkit-transform-origin:50% -100px;-webkit-animation:swing 5s infinite ease-in-out;box-shadow:-5px 5px 30px 4px #fc903d} .deng{position:relative;width:120px;height:90px;margin:50px;background:#d8000f;background:rgba(216,0,15,.8);border-radius:50% 50%;-webkit-transform-origin:50% -100px;-webkit-animation:swing 3s infinite ease-in-out;box-shadow:-5px 5px 50px 4px #fa6c00} .deng-a{width:100px;height:90px;background:#d8000f;background:rgba(216,0,15,.1);margin:12px 8px 8px 8px;border-radius:50% 50%;border:2px solid #dc8f03} .deng-b{width:45px;height:90px;background:#d8000f;background:rgba(216,0,15,.1);margin:-4px 8px 8px 26px;border-radius:50% 50%;border:2px solid #dc8f03} .xian{position:absolute;top:-20px;left:60px;width:2px;height:20px;background:#dc8f03} .shui-a{position:relative;width:5px;height:20px;margin:-5px 0 0 59px;-webkit-animation:swing 4s infinite ease-in-out;-webkit-transform-origin:50% -45px;background:orange;border-radius:0 0 5px 5px} .shui-b{position:absolute;top:14px;left:-2px;width:10px;height:10px;background:#dc8f03;border-radius:50%} .shui-c{position:absolute;top:18px;left:-2px;width:10px;height:35px;background:orange;border-radius:0 0 0 5px} .deng:before{position:absolute;top:-7px;left:29px;height:12px;width:60px;content:" ";display:block;z-index:999;border-radius:5px 5px 0 0;border:solid 1px #dc8f03;background:orange;background:linear-gradient(to right,#dc8f03,orange,#dc8f03,orange,#dc8f03)} .deng:after{position:absolute;bottom:-7px;left:10px;height:12px;width:60px;content:" ";display:block;margin-left:20px;border-radius:0 0 5px 5px;border:solid 1px #dc8f03;background:orange;background:linear-gradient(to right,#dc8f03,orange,#dc8f03,orange,#dc8f03)} .deng-t{font-family:华文行楷,Arial,Lucida Grande,Tahoma,sans-serif;font-size:3.2rem;color:#dc8f03;font-weight:700;line-height:85px;text-align:center} .night .deng-box,.night .deng-box1,.night .deng-t{background:0 0!important}@-moz-keyframes swing{0%{-moz-transform:rotate(-10deg)}50%{-moz-transform:rotate(10deg)}100%{-moz-transform:rotate(-10deg)}}@-webkit-keyframes swing{0%{-webkit-transform:rotate(-10deg)}50%{-webkit-transform:rotate(10deg)}100%{-webkit-transform:rotate(-10deg)}} </style> <article> <div class="gn_box wow zoomIn"> <h1> <center><font color=#E80017>2</font><font color=#D1002E>0</font><font color=#BA0045>2</font><font color=#A3005C>1</font><font color=#8C0073>年</font><font color=#75008A>-</font><font color=#5E00A1>新</font><font color=#4700B8>年</font><font color=#3000CF>倒</font><font color=#1900E6>计</font><font color=#0200FD>时</font> </center> </h1> <center> <div id="CountMsg" class="HotDate" style="margin-bottom: 10px;"> <font color="red"><span id="t_d">* 天</span></font> <font color="red"><span id="t_h">* 时</span></font> <font color="red"><span id="t_m">* 分</span></font> <font color="red"><span id="t_s">* 秒</span></font> </div> </center> <script type="text/javascript"> function getRTime() { var EndTime = new Date("2021/02/11 00:00:00"); var NowTime = new Date(); var t = EndTime.getTime() - NowTime.getTime(); var d = Math.floor(t / 1000 / 60 / 60 / 24); var h = Math.floor(t / 1000 / 60 / 60 % 24); var m = Math.floor(t / 1000 / 60 % 60); var s = Math.floor(t / 1000 % 60); document.getElementById("t_d").innerHTML = d + " 天"; document.getElementById("t_h").innerHTML = h + " 时"; document.getElementById("t_m").innerHTML = m + " 分"; document.getElementById("t_s").innerHTML = s + " 秒"; } setInterval(getRTime, 1000); </script> </div> </article> <!--新年倒计时结束-->
-
LNMP模式下Nginx如何设置域名301重定向 LNMP下的Nginx如果想将域名lnmp.org 301重定向到www.lnmp.org,同时www.lnmp.org已经添加上,可以按如下步骤修改 使用命令编辑器vi、nano或winscp图形管理软件编辑对应的虚拟主机,一般虚拟主机配置文件位于:/usr/local/nginx/conf/vhost/域名.conf,如添加的域名是www.lnmp.org则配置文件是/usr/local/nginx/conf/vhost/www.lnmp.org.conf在配置文件代码如下:lnmp.org 301跳转到www.lnmp.org示例配置如下:省略www.lnmp.org虚拟主机server配置 server { listen 80; server_name lnmp.org; return 301 http://www.lnmp.org$request_uri; }如果是想让http强制跳转到https,把里面的http换成https就行。http站点301跳转到https站点示例配置如下:server { listen 443 ssl; server_name www.lnmp.org; 省略其他配置 } server { listen 80; server_name lnmp.org; return 301 https://www.lnmp.org$request_uri; }按上面例子修改完成后保存,执行:/etc/init.d/nginx restart 重启nginx,使其生效。该设置不适用于Let'sEncrypt及其他需要http验证的SSL证书;如果使用DNS API方式可以使用这种设置方法。如果是想让https://lnmp.org强制跳转到https://www.lnmp.org可以在https的虚拟主机配置文件中root行或server_name行下面添加上if ($host = 'lnmp.org') { return 301 https://www.lnmp.org$request_uri; }如果要设置对应域名的http跳到对应https站点上如:http://lnmp.org 跳到 https://lnmp.org,http://www.lnmp.org 跳到 https://www.lnmp.org 上。在对应域名的http虚拟主机配置文件中添加:return 301 https://$host$request_uri;如果使用Let'sEncrypt免费SSL证书使用的Let's Encrypt的免费证书且使用http验证方式生成的SSL证书,如果你要想设置301,编辑要设置301域名的nginx虚拟主机配置文件,找到包含有listen 80;的server段,在location ~ /.well-known { allow all; }这几行下面添加,如下配置:location / { return 301 https://$host$request_uri; }保存,如果不设置会导致证书无法正常续期。完整的适用于Let'sEncrypt的301跳转配置文件如下:server { listen 80; #listen [::]:80; server_name lnmp.org www.lnmp.org; index index.html index.htm index.php default.html default.htm default.php; root /home/wwwroot/lnmp.org; location ~ /.well-known { allow all; } location / { return 301 https://$host$request_uri; } }注意:以上所有更改nginx的配置都需要重启ngin生效。来源 © LNMP.org
-
Markdown基本语法 前言Markdown是一种轻量级标记语言,它允许人们使用易读易写的纯文本格式编写文档,然后转换成有效的XHTML或HTML文档。由于Markdown的轻量化、易读易写特性,并且对于图片,图表、数学式都有支持,目前许多网站都广泛使用Markdown来撰写帮助文档或是用于论坛上发表消息。目前博客主要在本地用Markdown语言写作,然后转移到网站,故粗略了解了一下基本语法。基本语法一、标题在标题文字前加#表示一个#是一级标题,二个#是二级标题,以此类推。支持六级标题。示例:# 这是一级标题 ## 这是二级标题 ### 这是三级标题 #### 这是四级标题 ##### 这是五级标题 ###### 这是六级标题显示效果:这是一级标题这是二级标题这是三级标题这是四级标题这是五级标题这是六级标题二、字体加粗:需要加粗的文字左右两边分别用两个*号包起来斜体:需要倾斜的文字左右两边分别用一个*号包起来斜体加粗:需要倾斜和加粗的文字左右两边分别用三个*号包起来删除线:需要加删除线的文字左右两边分别用两个~~号包起来示例:**这是加粗的文字** *这是倾斜的文字*` ***这是斜体加粗的文字*** ~~这是加删除线的文字~~显示效果:这是加粗的文字这是倾斜的文字`这是斜体加粗的文字这是加删除线的文字三、引用在引用的文字前加>即可。引用也可以嵌套,如加两个>>三个>>>...n个>>>>...示例:>这是引用的内容 >>这也是引用的内容四、分割线三个或者三个以上的 - 或者 * 皆可。示例:--- ---- *** *****显示效果:五、超链接语法:[超链接名](超链接地址 "超链接title") title可加可不加示例:[腾讯视频](https://v.qq.com) [爱奇艺](https://iqiyi.com)显示效果:腾讯视频爱奇艺六、列表语法:无序列表用 - + * 任何一种都可以 - 列表内容 + 列表内容 * 列表内容 注意:- + * 跟内容之间都要有一个空格显示效果:列表内容列表内容列表内容有序列表:语法:1. 列表内容 2. 列表内容 3. 列表内容 注意:数字加点即可,序号跟内容之间要有空格效果如下:列表内容列表内容列表内容七、表格语法:表头|表头|表头 ---|:--:|---: 内容|内容|内容 内容|内容|内容 第二行分割表头和内容。 第二行设置文字属性: 文字默认居左 两边加:表示文字居中 右边加:表示文字居右 注:原生的语法两边都要用 | 包起来。此处省略显示效果:序号姓名关系一唐僧师傅二孙悟空徒弟其它参考 © 小灯泡设计
-
升级Centos 8内核版本 1.查看当前内核版本使用的系统版本,当前日期CentOS最新版:# cat /etc/redhat-release CentOS Linux release 8.2.2004 (Core)查看当前系统内核版本:# uname -r 4.18.0-193.6.3.el8_2.x86_64当前日期 Linux 的内核很多都 5.x,各方面考虑还是有必要升级一下的,内核可以从这里直接下载:https://www.kernel.org/2.使用ELRepo仓库这里使用ELRepo仓库,ELRepo 仓库是基于社区的用于企业级 Linux 仓库,提供对 RedHat Enterprise(RHEL)和其他基于 RHEL的 Linux 发行版(CentOS、Scientific、Fedora 等)的支持。ELRepo 聚焦于和硬件相关的软件包,包括文件系统驱动、显卡驱动、网络驱动、声卡驱动和摄像头驱动等。网址:http://elrepo.org/tiki/tiki-index.php :导入ELRepo仓库的公共密钥:# rpm --import https://www.elrepo.org/RPM-GPG-KEY-elrepo.org安装ELRepo仓库的yum源:# yum install https://www.elrepo.org/elrepo-release-8.el8.elrepo.noarch.rpm可用的系统内核安装包:# yum --disablerepo="*" --enablerepo="elrepo-kernel" list available Last metadata expiration check: 0:25:21 ago on Tue 14 Dec 2021 02:15:01 PM CST. Available Packages bpftool.x86_64 5.15.7-1.el8.elrepo elrepo-kernel kernel-lt.x86_64 5.4.164-1.el8.elrepo elrepo-kernel kernel-lt-core.x86_64 5.4.164-1.el8.elrepo elrepo-kernel kernel-lt-devel.x86_64 5.4.164-1.el8.elrepo elrepo-kernel kernel-lt-doc.noarch 5.4.164-1.el8.elrepo elrepo-kernel kernel-lt-headers.x86_64 5.4.164-1.el8.elrepo elrepo-kernel kernel-lt-modules.x86_64 5.4.164-1.el8.elrepo elrepo-kernel kernel-lt-modules-extra.x86_64 5.4.164-1.el8.elrepo elrepo-kernel kernel-lt-tools.x86_64 5.4.164-1.el8.elrepo elrepo-kernel kernel-lt-tools-libs.x86_64 5.4.164-1.el8.elrepo elrepo-kernel kernel-lt-tools-libs-devel.x86_64 5.4.164-1.el8.elrepo elrepo-kernel kernel-ml-devel.x86_64 5.15.7-1.el8.elrepo elrepo-kernel kernel-ml-doc.noarch 5.15.7-1.el8.elrepo elrepo-kernel kernel-ml-headers.x86_64 5.15.7-1.el8.elrepo elrepo-kernel kernel-ml-modules-extra.x86_64 5.15.7-1.el8.elrepo elrepo-kernel kernel-ml-tools.x86_64 5.15.7-1.el8.elrepo elrepo-kernel kernel-ml-tools-libs.x86_64 5.15.7-1.el8.elrepo elrepo-kernel kernel-ml-tools-libs-devel.x86_64 5.15.7-1.el8.elrepo elrepo-kernel perf.x86_64 5.15.7-1.el8.elrepo elrepo-kernel python3-perf.x86_64 5.15.7-1.el8.elrepo elrepo-kernel3.安装最新版内核# yum --enablerepo=elrepo-kernel install kernel-ml4.设置以新的内核启动0 表示最新安装的内核,设置为 0 表示以新版本内核启动:# grub2-set-default 0以后不需要第5步,直接使用这条指定不同数字设置不同内核版本启动。5.生成grub配置文件并重启系统# grub2-mkconfig -o /boot/grub2/grub.cfg # reboot这一步可以不用执行生成grub配置的命令,直接重启!6.验证新内核$ uname -r 5.15.7-1.el8.elrepo.x86_647.查看系统中已安装的内核可以看到这里一共安装了2个版本的内核,分别是 v4.18.0-305.3.1和v5.15.7-1。# rpm -qa | grep kernel kernel-ml-modules-5.15.7-1.el8.elrepo.x86_64 kernel-headers-4.18.0-305.3.1.el8.x86_64 kernel-4.18.0-305.3.1.el8.x86_64 kernel-tools-4.18.0-305.3.1.el8.x86_64 kernel-devel-4.18.0-305.3.1.el8.x86_64 kernel-ml-core-5.15.7-1.el8.elrepo.x86_64 kernel-core-4.18.0-305.3.1.el8.x86_64 kernel-modules-4.18.0-305.3.1.el8.x86_64 kernel-tools-libs-4.18.0-305.3.1.el8.x86_64 kernel-ml-5.15.7-1.el8.elrepo.x86_648.删除旧内核删除旧内核,这一步是可选的。# yum remove kernel-core-4.18.0 kernel-devel-4.18.0 kernel-tools-libs-4.18.0 kernel-headers-4.18.0再查看系统已安装的内核,确认旧内核版本已经全部删除:# rpm -qa | grep kernel kernel-ml-modules-5.15.7-1.el8.elrepo.x86_64 kernel-ml-core-5.15.7-1.el8.elrepo.x86_64 kernel-ml-5.15.7-1.el8.elrepo.x86_64也可以安装yum-utils工具,当系统安装的内核大于3个时,会自动删除旧的内核版本:# yum install yum-utils删除旧的版本使用 package-cleanup 命令。9.参考文献ELRepo官网:http://elrepo.org/tiki/index.phpCentos7升级内核版本:https://www.cnblogs.com/xzkzzz/p/9627658.html参考 © CSDN
-
Wordpress搬家换域名后的相关操作 打开根目录下wp-config.php找到WordPress数据库的名称: define('DB_NAME', '填写你的数据库名称'); MySQL数据库用户名: define('DB_USER', '填写你的数据库账号'); MySQL数据库密码: define('DB_PASSWORD', '填写你的数据库密码');登陆phpMyAdmin,点sql进去,把旧域名改成新域名执行即可UPDATE wp_posts SET post_content = replace( post_content, '旧域名','新域名') ; UPDATE wp_comments SET comment_content = replace(comment_content, '旧域名', '新域名') ; UPDATE wp_comments SET comment_author_url = replace(comment_author_url, '旧域名', '新域名') ; UPDATE wp_options SET option_value = replace( option_value , '旧域名','新域名') ;
-
解决Typecho无法正确显示Gravatar头像 因为某些原因在中国大陆Gravatar头像彻底无法进行访问。由于主题前端一般都可以设置第三方国内镜像源,所以没什么问题。而Typecho后台显示却无法正常加载,很是让人难受。解决方案一修改默认Gravatar头像地址为第三方国内镜像源从网站根目录进入/var/Typecho打开Common.php,找到名为gravatarUrl的function,大概在932行左右,可以用搜索功能查找一下。找到如下所示的代码:if (defined('__TYPECHO_GRAVATAR_PREFIX__')) { $url = __TYPECHO_GRAVATAR_PREFIX__; } else { $url = $isSecure ? 'https://secure.gravatar.com' : 'http://www.gravatar.com'; $url .= '/avatar/'; }修改https://secure.gravatar.com为国内第三方镜像源地址,修改/avatar/为镜像源的文件夹,如此操作后台即可正常显示Gravatar头像。不要忘记https://和文件夹两侧的/以第一个镜像源为例,使用上文所述的方法修改完后的结果为:if (defined('__TYPECHO_GRAVATAR_PREFIX__')) { $url = __TYPECHO_GRAVATAR_PREFIX__; } else { $url = $isSecure ? 'https://sdn.geekzu.org' : 'http://www.gravatar.com'; $url .= '/avatar/'; }解决方案二直接打开Typecho安装目录下的config.inc.php文件,加入以下代码即可(加在任何位置都可)define('__TYPECHO_GRAVATAR_PREFIX__', 'https://sdn.geekzu.org/avatar/');示例推荐第三方国内镜像源:https://sdn.geekzu.org/avatar/ (推荐)https://dn-qiniu-avatar.qbox.me/avatar/https://cdn.v2ex.com/gravatar/https://gravatar.loli.net/avatar/参考自© 呆小萌_Dream